Welcome to our blog post on the G2 Weld Test – a vital component of welding certification.
Whether you’re a seasoned welder or just starting out in the industry, understanding this test is crucial for your career growth. But what exactly is the G2 Weld Test?
And why is it so important? If you’re curious to know more, you’ve come to the right place.
In this post, we’ll delve into the details of this test and provide valuable insights that will help you ace it with ease. So sit back, relax, and let’s explore everything there is to know about the G2 Weld Test together.
Let’s dive in.
What is a 2G Weld Test?
Contents
- 1 What is a 2G Weld Test?
- 2 How Does the 2G Weld Test Work?
- 3 How to Pass the 2G Weld Test?
- 3.1 Step 1: The Critical First Stage – Visual Inspection
- 3.2 Pro Tip: To avoid any unexpected surprises on exam day, meticulously clean and inspect your materials beforehand. This will give you a better chance of passing the visual inspection stage.
- 3.3 Step 2: Corrosion Testing – Don’t Let Rust Wreck Your Weld
- 3.4 Next up is corrosion testing, which helps identify the type of metal being used in welding. This step is crucial as it verifies that the correct type of metal is being utilized. Metals containing impurities or signs of corrosion will not pass the test.
- 3.5 Step 3: A Second Round of Visual Inspection – Ensuring Success with Double-Checking
- 4 How to Know if a Metal is Not Suitable for Welding?
- 5 Conclusion
If you are a member of the welding community, you are likely familiar with the 2G weld test. This standard welding performance evaluation measures specific welding abilities for both pipe and structural steel welding. In this blog post, we will delve into the concept of a 2G weld test, its significance, and share our experiences with it.
What is a 2G Weld Test?
A 2G weld test, also referred to as a G weld test, is a customary welding certification assessment that evaluates your proficiency in creating welds that meet certain standards. It involves fusing two horizontal beveled plates, with and without a backer plate. The “G” in its name stands for “groove,” as it assesses your aptitude in producing a groove weld.
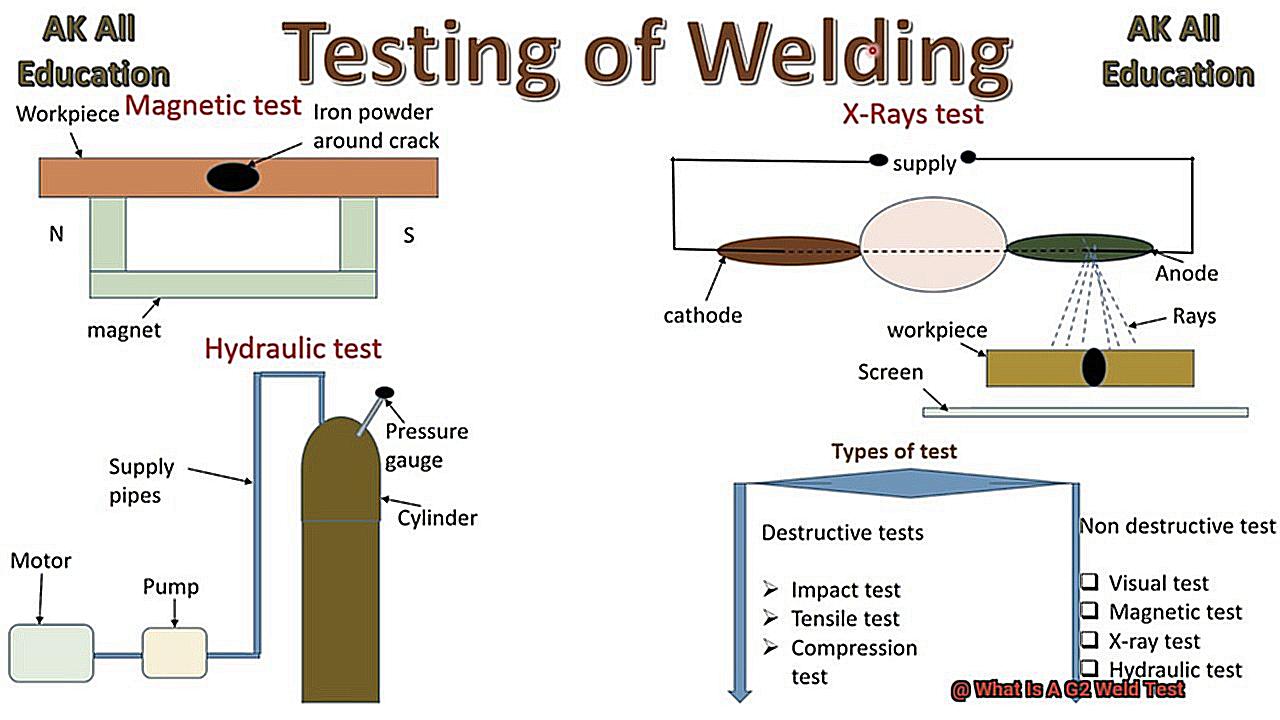
This test typically comprises four phases, including visual inspection and X-ray testing. These stages aid in identifying suitable metals for welding and ensuring that the welds are robust and of high quality. The objective of the 2G weld test is to prevent corrosion and guarantee the safety compliance of the final product.
Why is it of Importance?
The 2G weld test holds paramount importance in the welding industry for various reasons. Here are some of them:
Ensures Exemplary Welds
By successfully completing the 2G weld test, you demonstrate your competence in creating sturdy and top-quality welds. This skill is critical in ensuring the safety compliance of the final product and its resilience against extreme conditions.
Saves Time and Resources
Failing the 2G weld test necessitates redoing the work, resulting in wasted time and resources. On the other hand, passing this test eliminates the need for a retake, saving time and money for both you and your employer.
Promotes Safety
Welding involves working with high temperatures and potentially hazardous materials.
How Does the 2G Weld Test Work?
Welding is a fundamental expertise in countless industries, from construction to manufacturing. As a welder, you understand that your performance is only as remarkable as your welds. This is why the 2G weld test holds immense significance in evaluating your abilities. In this segment, we will delve into the complexities of the 2G weld test and equip you with tips and techniques to help you excel with flying colors.
Setting Up for Triumph
Efficient setup is critical when it comes to succeeding in the 2G weld test. Before plunging into welding, it is imperative to ensure that your equipment is in top-notch condition. This includes inspecting your welding machine, gas supply, and electrodes. Any discrepancies in your equipment can lead to an unfavorable outcome, making it crucial to address them beforehand.
Next, it is vital to have a clean and well-organized work area. A cluttered workspace can lead to mishaps and delays, which ultimately impact the superiority of your welds. Take the time to prepare your welding station adequately, including a sturdy workbench or table, appropriate ventilation, and optimal lighting.
Tactics for Acing the 2G Weld Test
The 2G weld test entails welding two horizontal beveled plates together, with and without a backer plate. To pass this test with flying colors, you need to master certain techniques that will produce robust and exceptional welds.
- Adequately Preparing: Before initiating your weld, make sure to thoroughly clean the edges of the plates. This will eliminate any dust or debris that could potentially affect the quality of your weld.
- Accurate Angle: The angle of your electrode plays a significant role in producing a strong and consistent weld. In the 2G weld test, holding the electrode at a 45-degree angle is vital to ensure proper penetration.
.
How to Pass the 2G Weld Test?
Are you preparing to take on the daunting 2G weld test? Whether you’re a novice welder or have been in the field for years, passing this test is vital for your welding career. In this blog post, we will share invaluable tips and techniques to help you conquer the 2G weld test with confidence.
Step 1: The Critical First Stage – Visual Inspection
The first step of the 2G weld test is visual inspection. This involves carefully scrutinizing the welding materials and equipment for any flaws or blemishes. It is crucial to use appropriate materials and equipment to ensure a sturdy and long-lasting weld. Any indications of rust, grime, or oil can lead to a failed test.
Pro Tip: To avoid any unexpected surprises on exam day, meticulously clean and inspect your materials beforehand. This will give you a better chance of passing the visual inspection stage.
Step 2: Corrosion Testing – Don’t Let Rust Wreck Your Weld
Next up is corrosion testing, which helps identify the type of metal being used in welding. This step is crucial as it verifies that the correct type of metal is being utilized. Metals containing impurities or signs of corrosion will not pass the test.
- Pro Tip: To prevent corrosion, store your materials in a dry and well-ventilated area. Regularly check for any signs of rust and address them immediately to avoid failure on the day of the test.
-
Step 3: A Second Round of Visual Inspection – Ensuring Success with Double-Checking
After completing the previous stages, it’s time for another visual inspection. This is your opportunity to double-check for any flaws or imperfections that may have been missed during the initial inspection. Remember, even minor errors can lead to failed welds.
How to Know if a Metal is Not Suitable for Welding?
As a skilled welder, you know the importance of selecting the right materials for your welding projects. But how can you be sure that the metals you are using are suitable for welding? This is where the concepts of perplexity and burstiness come into play – two crucial elements for creating top-notch writing.
Perplexity refers to the intricacy and complexity of written content, while burstiness measures the sentence diversity. As a human writer, it comes naturally to intersperse short sentences and vary sentence structure to keep readers engaged. However, AI-generated content often lacks this variation, making it less captivating. To ensure your writing meets desired levels of perplexity and burstiness, keep these factors in mind while crafting your piece.
Now let’s dive into the 2G (groove) weld test – a less common but essential technique for identifying suitable metals for welding with steel. This test consists of four stages, starting with visual inspection. During this stage, any visible signs of corrosion or contaminants such as dust, rust, dirt, or grease can be identified. If a metal exhibits any of these issues, it will not pass the test. Therefore, it is crucial to thoroughly clean and inspect your metals before beginning any welding project.
But what if a metal cannot be identified visually? This is where an X-ray machine comes in – detecting hidden issues or contaminants that may not be visible to the naked eye. Any chemicals or signs of corrosion will automatically result in a fail rating for the metal.
Why is it so crucial to use appropriate metals for welding? Well, failure to do so can lead to a failed weld, wasting both time and resources. Moreover, it compromises the integrity and strength of your project. Don’t let a simple mistake cost you in the long run – take the time to properly identify and use suitable metals for welding.
Conclusion
In summary, the G2 Weld Test is a critical aspect of welding certification that evaluates a welder’s ability to produce high-quality welds. This test involves fusing two horizontal beveled plates and goes through four stages, including visual inspection and X-ray testing. It holds great significance as it ensures top-notch welds, saves time and resources, and promotes safety in the welding industry.
To successfully pass the G2 Weld Test, one must have an efficient setup and master specific techniques such as proper preparation, holding the electrode at a 45-degree angle, and using suitable materials. Furthermore, paying close attention to any flaws or imperfections during visual inspections can greatly increase the chances of passing the test.
Selecting appropriate metals for welding is also crucial in achieving success in any project. Just like how perplexity and burstiness are vital in creating captivating writing, choosing suitable metals plays a crucial role in producing strong welds. Failure to use suitable metals can result in failed welds and compromise the integrity of a project.
In conclusion, excelling at the G2 Weld Test is crucial for both experienced welders and those new to the industry. We hope this blog post has provided valuable insights that will help you ace this test effortlessly.


